
87 Monte SS - Upgrades


One of the primary features of my rebuild will include this. This was an fleabay score back when they still accepted money orders rather than strong-arming folks into using PayPal.
The previous owner had cut out the back of the unit pretty carefully, as this generation of Trans Am shaker was sealed at the factory. I plan on installing a flapper-door setup for full functionality, so this didn't bother me.
I'd always thought this generation of shaker would look good on an SS due to the center ridge that matches the hood. I like to stand out from the crowd, so the cowl-induction hood everyone and their brother is running quickly fell from favor.

I toyed with a dual snorkle air cleaner on the LS when I was running it around briefly. My original thought had been to utilize the dual snorkle base with the T/A shaker. The only problem is the dual snorkle is 15.5 inches in diameter and the T/A shaker base is about 18 inches.
Since the T/A shaker base has all the indentations necessary to clear the distributor and various other items, I may use that base and build upon it. It'll probably be easier than fabricating a new piece to fit on the shaker that will mate to the dual snorkle setup. At this point I'm only guessing though.
Another exterior feature I wanted were a pair of fender vents. Naturally, I turned to the GM F-Body cars of the late '70's. The main problem I encountered was one of proportions. The vents used on the Camaro Z28 (and the Pontiac Trans Am) were obviously too big for my fenders.
Camaro Vents
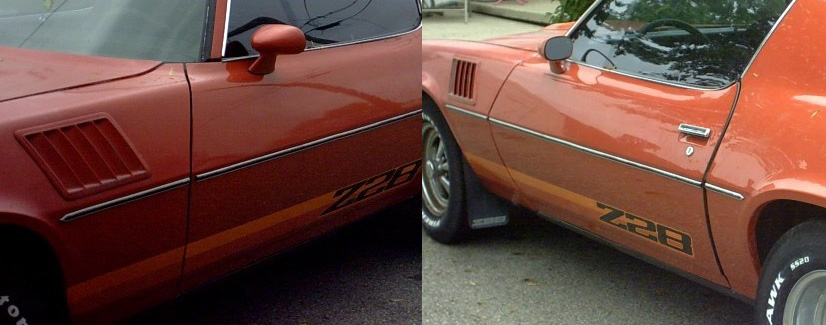
As with the shaker, I wanted these to be functional not simply a tacked on decoration. I found the solution was as close as the Monte's primary rival the Buick GNX. This realization (in addition to some folks already having done this mod) clinched the idea.

Here's a shot of the vents I selected for those who haven't seen them before. My original thought had been to utilize the fender vents for the same purpose as the GM engineers... venting underhood heat. Once I decided to make use of headers, this consideration became even more important.
Evidently these were originally held on with adhesive foam tape. I'm not certain if the originals had any ductwork associated with them. At least I've never seen any. It'd be easy enough to fabricate some if I deem it necessary once I get to that point of the build.
Interior
Interior - Dash Re-Design
I've never been a big fan of the stock dash, specifically the instrument panel on the Monte SS. Not that it wasn't a good effort, they did include full instrumentation instead of idiot lights after all. But I had a couple of problems with it. First, functionality.
When you're driving down the road thinking you're overheating then flick the gauge with your finger only to have it come back down to where it should be, there's a problem.
My other gripe was the 11th hour "tacked on" feel to the instrument panel.
I found one enthusiast who replaced the factory speedometer with one out of a Chevy Malibu cop car. I'd been planning all along on upgrading to a 160 MPH unit, so this idea intrigued me.
But I had a couple of problems with this approach. First, just where in the blue blazes (outside of Flea-Bay) would I ever find a similar speedo to add to my stock cluster? Problem two...it's still the stock cluster in every other aspect. Nice subtle approach though.
The problem with GM's mini gauges is that ordinary old-school aftermarket gauges won't fit, due primarily to a lack of room.
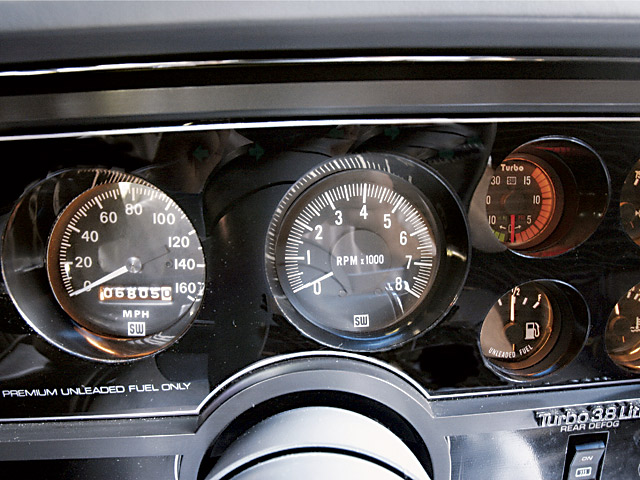
As I pondered what to replace my crappy gauges with, I stumbled across the Buick GNX dash. It was love at first bite. Of particular interest was the fact that the skunk-works responsible for the radical GNX saw fit to go old school and slap a set of Stewart Warner gauges in the thing.
The only problem with this idea was the limited production run of the Buick GNX. When new folks were snapping them up as blue-chip investments, banking on the value of such a limited machine. Of course this means parts of such a machine are hard to come by as well.
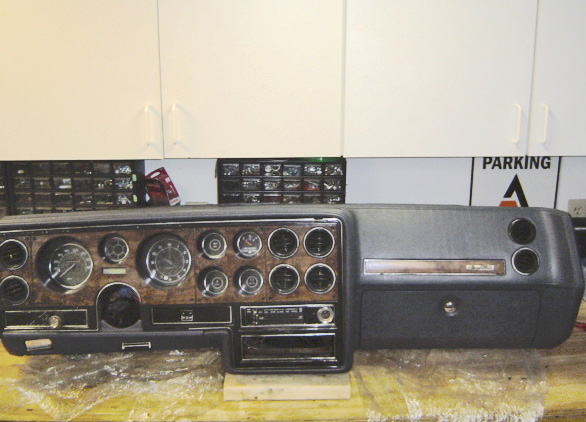
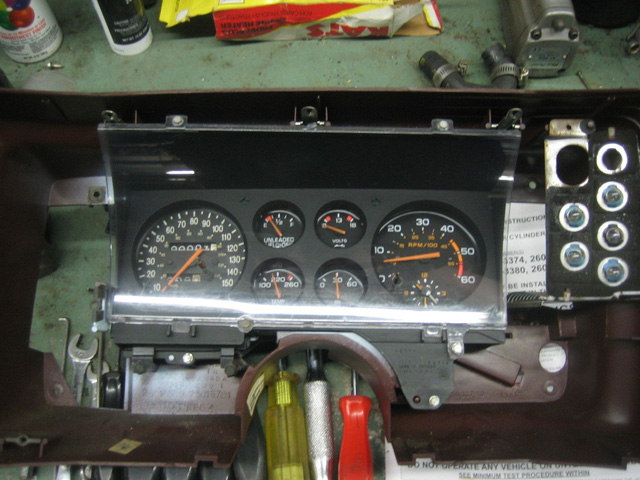
After studying various approaches other SS owners had taken, I reached a decision. I summarily scrapped the whole "hybrid dash" idea and instead selected a Pontiac Grand Prix dash from the same era as my Monte.
I decided that the Grand Prix dash had a much more integrated look, like somebody took their time to create a usable layout. What I plan on doing is adapting the stock instrument cluster, installing my Stewart Warner gauges, while keeping the stock idiot light pod in between.
Mexican Montes actually came with the Grand Prix dash as standard equipment. Hmmmmm.
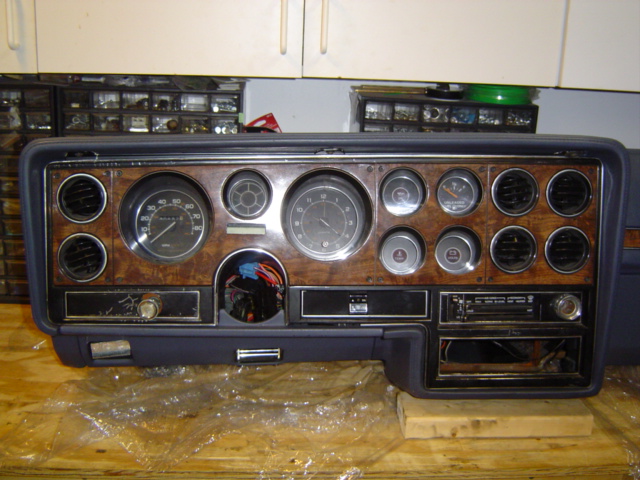
The more I look at this dash, the better I like it. I really like the rectangular theme played off against the round instruments and A/C vents. Much better than the dominant rectangle look of both the Monte and the Regal dashes.
Other enthusiasts have used the flat black approach to replace the wood grain. I'm taking a different approach. Harkening back to the glory days of Pontiac (and even further to cars of the '30's) I'm going to go with an engine-turned applique.
Or, I can flip it around the opposite way and engine turn the lower half. I'm not sure which would look better.
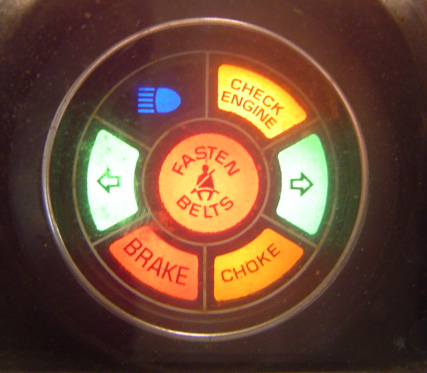
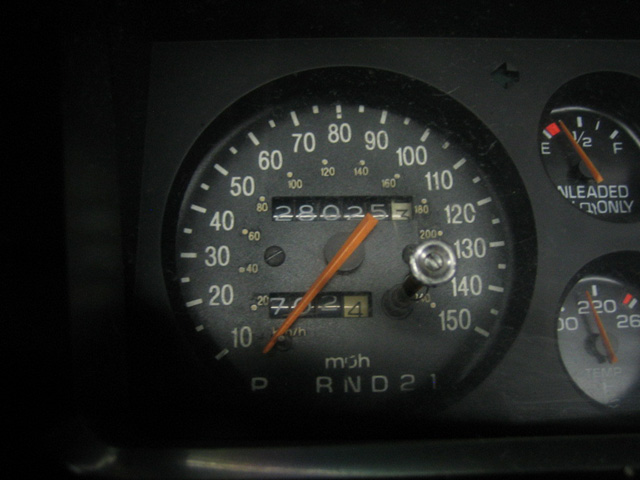
Here's a close up shot of the circular idiot light pod that resides between the speedometer and clock. Clock! I'd like to know just who is such a slave to the clock that you need a 4 inch diameter version right in your face. I'll be rectifying this shortly but it's one of those things that really make you wonder.
My plan is to retain this for a subtle and practical placement of those light you do need such as high beam indicator and turn signal indicators. What I'd really like to have is a "cruise" lamp for the cruise control and a "low fuel" lamp in place of the useless "choke" and "service engine soon" lamps. Not quite sure how to do that yet, other than scrounge what I want from another assembly.
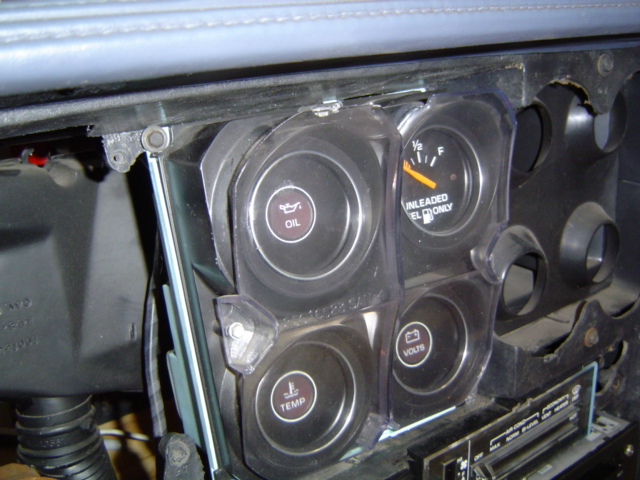
Here's a close up shot of the four-gauge array immediately to the right of the speedo/clock assembly. Unlike the mini gauges in the Monte, it looks like there's room here for your standard 2 1/8 inch gauges to be installed. I'd really like to keep the stock plastic lense and trim for a subtle performance look.
Some early '80's versions equipped with gauges almost looked like quality aftermarket gauges. That was my inspiration for using a Grand Prix dashboard as a foundation upon which to fabricate just what I want. Granted I've only got idiot lights here, but they'll be going bye-bye soon enough.
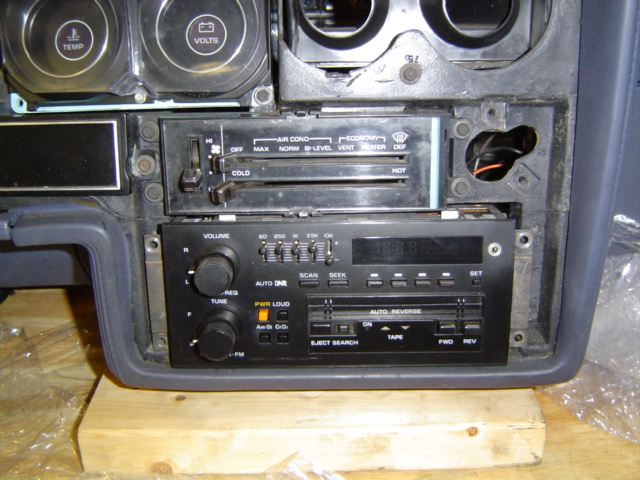
Here's a shot of mocking up the SS radio to the GP dash. The holes are so close, like maybe 1/8 inch away from fitting properly. It looks as though it will fit just fine if I Dremel off the two tabs sticking out of the top of the radio. I'll have to be careful not to screw up the radio in the process.
This model year probably had the old "twin knob" style of radio. Which I really wouldn't object to since it would add to the retro vibe I'm going for. But having already spent mucho dinero on this radio (with an equalizer and iPod hook up) I'd really like to keep this one. Time will tell I guess.
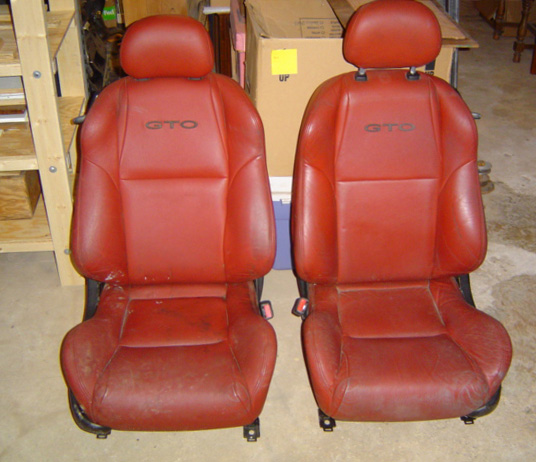
A trip to the Super Chevy Show in September of 2010, netted me a nice pair of used seats out of a 2006 Pontiac GTO. This has become a hugely popular upgrade on the montecarloss webside to the extent that some folks are working on custom adapter brackets. I never intended this project to be a homage to Pontiac, but it's sure shaping up that way.
Of course the color isn't even close to the dove gray I've got planned, but then again the blue back seat won't cut it either. My plan is to have the fronts and backs reupulstered together and then everything will match my new color scheme. The only other big hurdle will be to nab a set of seatbelts of the proper model year, color and configuration.
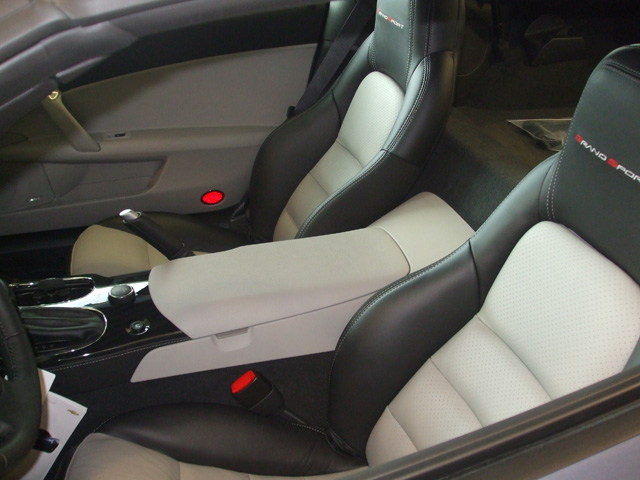
A trip to the local Chevy dealership for some routine service on my Silverado became another source of inspiration. While I waited, I moseyed over to the sales floor to check out the latest rolling stock. Lo and behold, there was a new Corvette with a blue exterior (lighter that what I have in mind) but of particular interest was the interior.
Since I'm planning on a blue/grey theme, this looks like a real winner. My plan is to have the fronts and backs reupulstered in the same material and color as this. The advantage here is (other than GM doing the color coordination for me) the greater availability of material for a newer car.
When you're building a street-rod (as opposed to a numbers-matching restoration) the sky's the limit when it comes to custom touches. For years, I'd toyed with the idea of converting my Monte from a bench seat/column set up, to bucket seats with a floor shifter. I stumbled across this at a local swap-meet and since it came out of a Grand Prix (a G-Body cousin) it seemed a natural, so I grabbed it.
'85 GP Console
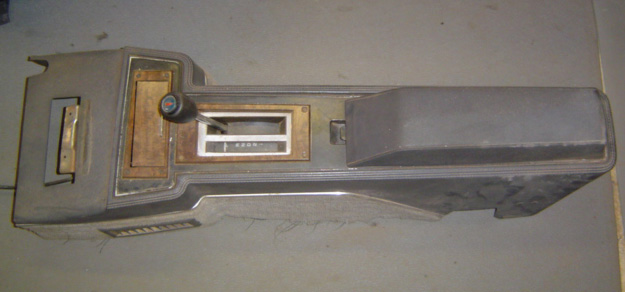
The deciding factor for me, was the fact that the guy who removed it took the time to include all the hardware, even going so far as to remove the mounting brackets from the floor of the GP. My plan is to weld them into my Monte and install the console. The shifter will have to be swapped out for one compatible with my automatic w/overdrive tranny, but at least this piece was the right color.
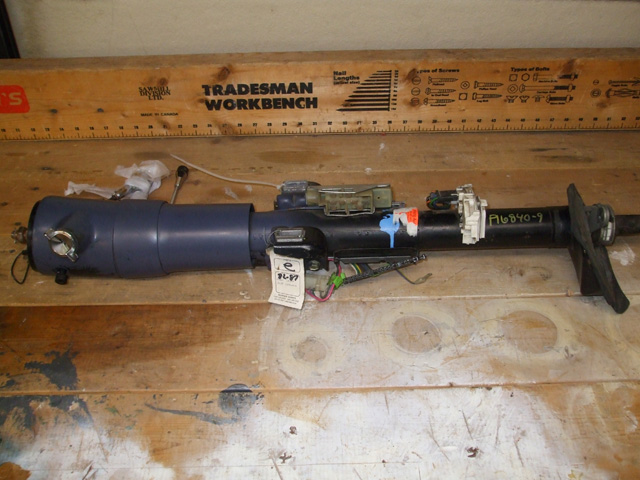
Reconfiguring the interior from a bench seat to a bucket seat set up requires several items. Since I'm going to be changing over from a column shift arrangement to a floor-shift arrangement I'm really going to need one of these.
After getting burned once on Flea-Bay I bit the bullet and grabbed this in a buy it now auction. This time however, I was only wagering around $200 bucks and was keeping a close watch on the 45 day PayPal INR (item not received) deadline.
I came home the Wednesday after winning the auction and it was waiting in my carport. Now that is a little more like it!
Rear End
8/20/11 - Summer Head Cold... and Craig's List Score!
So... Here I am raring to go back to work on the build, and I get a stupid summer cold. Sore throat, runny/stuffy nose, the whole 9 yards. Lovely. So I pop a Zicam cold tablet, some vitamin C, a few Ibuprofin, get comfy in my armchair and fire up the old laptop.
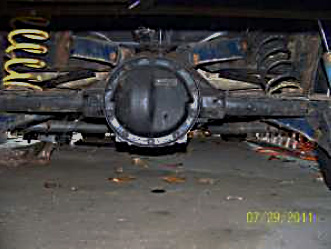
For whatever reason, I decide to surf on over to Craig's list. Naturally, being a car guy, I started perusing the car parts section. Suddenly I spot the holy grail (and a personal thorn in my side) of G-Body enthusiasts... the elusive GM 8.5 - 10 bolt rear end.
So I call the guy and it turns out he'd started installing it in a Monte Carlo dirt track car. We talked a bit and it turns out it was unmolested with the exception of some steep racing gears. That's okay though, I'll be purchasing all new parts (bearings, seals etc.) including the proper ratio for the street at a later date anyway.
So (cold and all) I drove over to his garage to check it out. Turns out he's refocusing his efforts on a late 60's firebird for autocross events. Saturday = "No Bank Access" here in the South, so I told him I'd take it and be back Monday morning with the cash.
The plan at this point is to go back to the stock 3.42 gears and a limited slip differential. Although Monte SS's came with a steeper 3.73 ratio, the extra horsepower and torque from my ZZ4 350 should make up the difference.
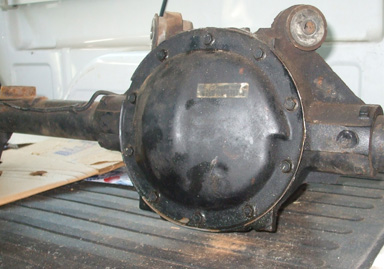
Here's a shot of the signature triangle tabs located on either side of the bottom of the differential cover.
As an added bonus, I later discovered that this rear also has the aluminum drums that were optional for a time. I'll see how these perform before making a decision regarding a rear disc brake upgrade I had planned.
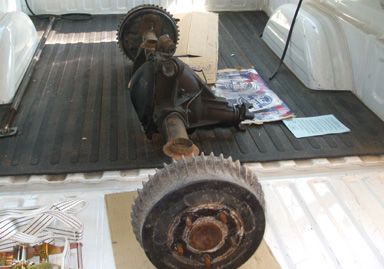
It had taken three of us (me, the previous owner, and his wife) to load this baby back at his garage. Evidently his wife helps him (hands on) with all his car projects! Lucky fellow. Thankfully, I was able to use my shop crane to lift it out of my pickup and onto a pair of jack stands in my shop.
Summer colds have got to be the worst, sapping all your energy in no time flat. With the rear safely locked away, I took some more pain pills and crashed for a few hours.
So in the final analysis, the weekend wasn't a total loss after all.
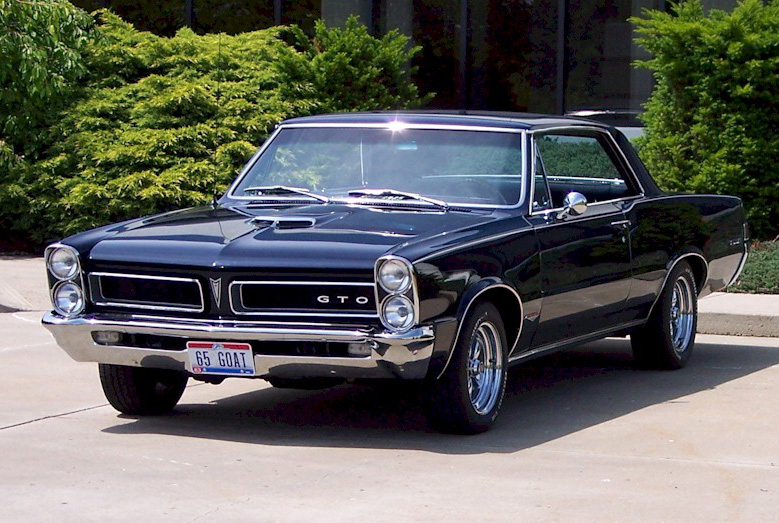
One day, on the spur of the moment (sans camera of course), I attended a local car show and was naturally drawn to the cars from the '60's - '70's. There, in the Pontiac area was a '65 GTO that was absolutely gorgeous.
The more I gawked at the restored beauty, the more I became convinced that I'd found the color I wanted for my SS. The blue was so dark it was almost black, depending upon where you were standing and how the sunlight played over the surface of the sheetmetal. The paint was also metalic which gave the paint a unique silver tone that I really liked. Before I got a chance to forget what I'd seen, I hopped on the 'net to see if I could find an example of what I'd seen at the show.
I not only found several examples but also found the name of this particular shade of blue. Armed with this crucial information it should be easy to have a batch mixed up in Urethane from my local paint supply shop.
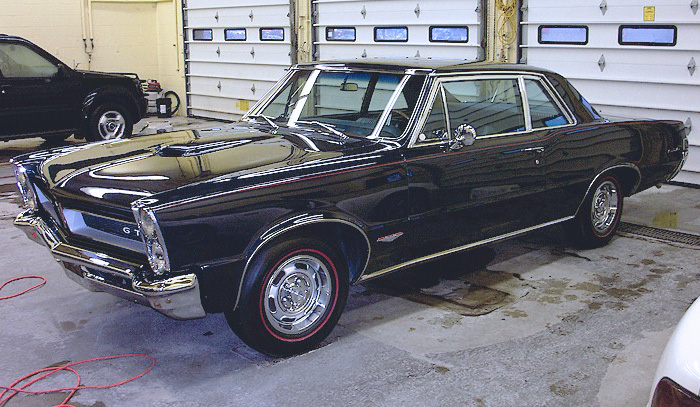
Here's an indoor shot where the lighting makes the car truly appear to be black. For the "stealth" look I have in mind for my SS, this color was a no-brainer. I think that the subtle contrast between the SS black-out trim will look great against the blue.
Since I'm changing the door handles to an older chromed design, the jury is still out on whether or not I'll leave the chrome or go for a black powder coat. The only thing that gives me pause is the chipping that exists in the factory black-out trim.
On one hand the flat-black trim is true to the SS design, while the chrome (or polished aluminum) has more of the "retro" feel I'm trying to capture. Although I'm a long way off from shooting the paint, I'm pondering all the important options now.
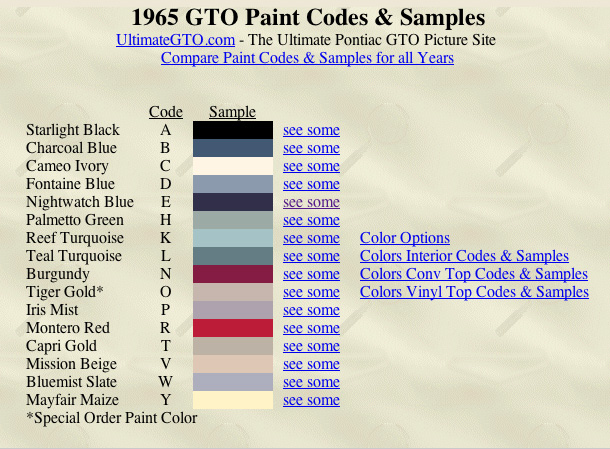
A few minutes of research yielded the color code and name of the mix that Pontiac used on the car back in the day. Nightwatch Blue. Even the name sounds cool!
Of course, the original color chart does not appear to be metallic. The placard next to the car at the show, mentioned original factory blue paint. But who's to say the owner didn't specify a metallic paint?
Either way, I don't care. When the time comes, I'm going to use a metallic paint because I feel that is what gave the silvery hue to the car I saw at the show.

© Copyright 2009 Brian Petruska | Top | Bodyshop | GM Performance Parts | HTML Now! | Apple | Comments |